Ready to master your company’s Facebook presence? Here’s everything you need to know.
✅ Bonus: Learn how to build a top-of-funnel test campaign on Facebook. The blog explains what exactly to click and what you’ll need to prepare for your first ad campaign.
A step-by-step guide to setting up Facebook for business
Setting up a Facebook Page for your business is absolutely free and it only takes about five minutes of your time! Here’s how:
- Log in to your personal account to get started.
- Head to facebook.com/pages/create.
- Enter your Page name, Category, Description, and hit “Create Page”.
- Now, upload your profile picture, and cover photo.
- Click Create @username to make your own personalized vanity URL. It can be up to 50 char long and helps people find you easily on Facebook.
- Click “Add a button” to set up a CTA for your page. It could be “Follow”, “Sign up”, “Learn More”, etc.
- Click “More” → “About” → “Edit Page Info”: fill in your contact info, location, operating hours, and any other relevant details.
- And you are done. Pat your shoulder because you just created your Facebook Business Page, and it’s beautiful!
Facebook Business Manager
To take your strategy game to another level, set up your Facebook Business Manager account. Facebook itself explains Business Manager is a one-stop shop to manage business tools, business assets, and employee access to these assets. If you want to work with an agency (like, ahem, CrowdTamers) on your social media posts or ads, you’ll definitely want to set this up now.
The #1 problem we have with onboarding FB Marketing for our clients is that they often don’t understand how to share admin rights on their FB business page, don’t have the billing connected correctly, or don’t have a FB business page at all. So, first, let’s learn how to set up a Facebook Business Manager.
Create a Facebook Business Manager account
- Go to business.Facebook.com and click the Create Account button in the top right.

- Enter your business name, your name, and the business email address you want to use to manage your Facebook Business Manager account, then click Next.
- Enter your business details: address, phone number, and website. You’ll also need to specify whether you will use this Business Manager account to promote your own business or to provide services to other businesses (like an agency). When you’re finished, click Submit.
- Check your email for a message with the subject line “Confirm your business email.” Within the message, click Confirm Now.
Add your Facebook Business Page
- From the Business Manager dashboard, click Add Page. Then, in the pop-up box, click Add Page again.


- Start typing the name of your Facebook business page in the text box. Your business page name should autocomplete, so you can just click on it. Then click Add Page.
- If you have more than one Facebook page associated with your business, add the remaining pages by following the same steps.
Add your Facebook Ad Account(s).
Remember, once you add your ad account to Facebook Business Manager, you can’t remove it, so it is important to add only those accounts you own. To access a client account, click Request Access instead.
If you’re already using Facebook ads, you can link your existing ad account as follows:
- From the Business Manager dashboard, click Add Ad Account, then Add Ad Account again, and then enter the ad account ID, which you can find in Ads Manager.
If you don’t already have a Facebook ads account, here’s how to set one up.
- From the Business Manager dashboard, click Add Ad Account, then Create Account.
- Enter your account details, then click Next.
- Indicate that you are using the ad account for your own business, then click Create.

Add people to help you manage your Facebook assets
- From your Business Manager dashboard, click Add people.
- In the pop-up box, enter the business email address of a team member you want to add.
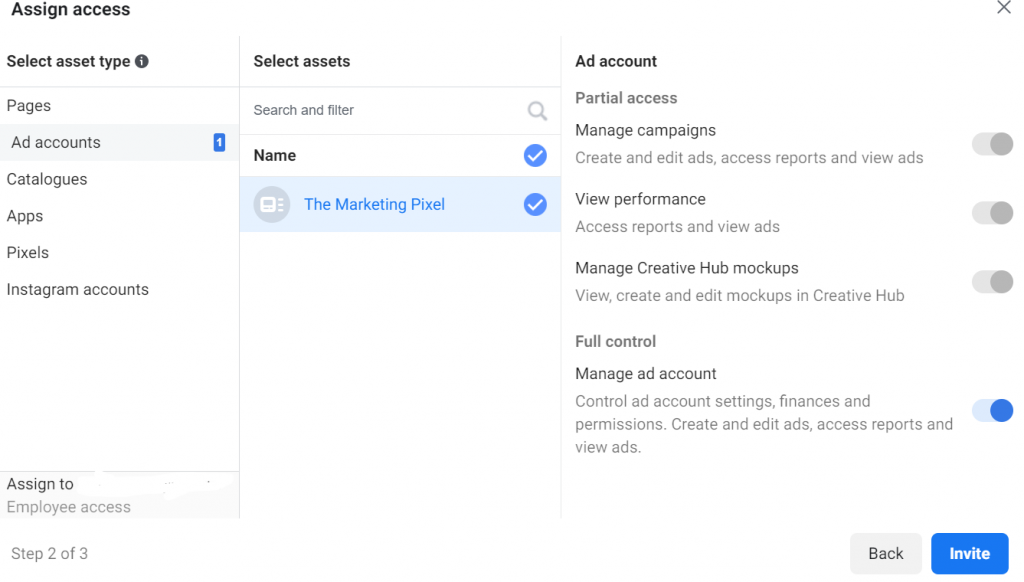
- You can decide whether to give these individuals limited account access (choose Employee access) or full access (choose Admin access). Make sure to add people using their work email addresses. Then click Next.

- In the left menu, click on Pages. Choose which pages you want this team member to work on. Customize the individual’s access using the toggle switches.

- Go back to the left menu and click on Ad Accounts. Again, customize the user’s access using the toggle switches. When you’re finished, click Invite.
Connect your business partners or ad agency
- From your Business Manager dashboard, click Business Settings at the top right.
- In the left menu, click Partners. Now click, Partner to share assets with, click Add.
- Your partner must have an existing Business Manager ID. Ask them to provide it to you. They can find it in their own Business Manager under Business Settings>Business Info. Enter the ID and click Add.
Set up Facebook Pixels
- From your Business Manager dashboard, click Business Settings.
- In the left column, expand the Data Sources menu and click Pixels, then click Add.
- Enter a name (up to 50 char) for your pixel, or you can enter your website under Check your website for easy setup options so Facebook can provide the best recommendations for how to set up your pixel, then click Continue.
- Click Set up the Pixel Now.
- Follow the detailed instructions for setting up the Facebook pixel and start collecting data.
Add a Payment Method
- From your Business Manager dashboard, click Business Settings.
- In the left column, click Payment Methods and then click Add Payment Method.
- Assign a Finance Editor and click Next.
- You are now required to add your Country, Currency, and Payment Method. Now, click Next.
- Enter your Card Details and click Save.
Anddd, that’s it! You are now ready to use your Facebook Business Manager to make the most out of your marketing efforts.
💡 Learn how to set up a Facebook Ad Campaign here.
Create your Facebook Marketing Strategy in 5 easy steps
Now that you’ve set up your Facebook page, here’s how to get more out of it by developing an effective strategy.
Define your audience
To engage with your audience effectively, it is important to understand who really your audience is and what they are looking for. Get to know your audience by asking these questions:
- Where do they live?
- How old are they?
- What language do they speak?
- What are their interests?
- What kind of jobs do they have?
It is, of course, important to understand the demographics of your audience. Once you find the answers to the above questions, you can now easily target your potential customer. How? Facebook’s free, built-in tool Audience Insights will help you drill down your potential customers. You can use it to find information like:
- Age
- Location
- Interests
- Language
- Gender
- Education
After all, if you do not know who you are trying to reach, you are unlikely to reach them, ever!
Set goals
What does success look like for your brand? It can sure be tempting to measure the ultimate achievement as the number of likes on your post (sometimes they are called Vanity metrics). But, without any broader marketing plan that includes measurement metrics such as ROI and conversion rates, these numbers are useless and meaningless.
Having a strong goal tied to your business objectives is an essential part of creating an effective Facebook Marketing Strategy. Every business has different goals and objectives, but each should focus on actions that affect its bottom line, which may include:
- Increasing conversions on your website
- Generating leads
- Improving customer service
Once you have decided what you want to achieve, we recommend mapping out specific and measurable ways of getting there. A recognized goal setting framework like the OKR goal framework, or SMART goals can help guide this process. Check out our post on the OKR framework for more details and examples.
Plan your content mix
Now that you know who your target audience is and what your goals are, it’s time to craft those posts finally and let ’em out open for everyone to see and interact.
Determine the right content mix, a good rule of thumb is to use the “80-20 Rule”. It means using 80% of your posts to inform, interact, and entertain and the remaining 20% about your brand.
What? only 20% about you?
Nobody is interested in listening to you talk just about yourself. Instead, aim to provide your users value and build relationships with your users.
Now, once you have decided what to post, it is time to learn when to post.
When you decide a particular time to post, you create an expectation among your users.
Whatever is your schedule, keep in mind to post consistently.
Create a content calendar to help balance your content mix. You can also use our free content calendar template to let you stay organized.
Optimize your page for engagement
Whatever your Facebook goal may be, it will be tough to achieve if no one knows about your Facebook page.
That is why it is important to
- Get people to your Facebook page,
- and compel ’em to interact with your content.
One of the best ways to optimize your page is to cross-promote it on different platforms. Let people know who are already interacting with you on some different platform find you on FB by linking your account. Leave your account link in your Newsletter.
Another thing to keep in mind is “interaction”. If you want users to interact with your post, it is equally important for you to engage with them too. It works both ways. Get chatty!
P.S: Give a little extra love to your Cover photo. That is the first thing people see when they enter your page. So, design it meaningful and fun.
Consider using other Facebook tools
Once you have got comfortable running your Facebook Business Page, it is time to explore different tools that Facebook provides and help you increase your reach even further.
Facebook Groups
In the digital age, a coffee shop is no longer an ordinary place to meet up. People use Facebook Groups as online communities to be themselves and share their ideas with others who have similar interests or goals in mind. With 1.8 billion monthly users of Facebook Groups, it is an audience too large to ignore!
You can also use Facebook Groups to showcase your expertise and provide added value, with bonus content or special deals that are just for “members.” This is a great way to build trust among loyal supporters who feel like they’re part of something bigger than themselves!
In order to create your Facebook Group, follow along with these instructions, and you will be good to go!
Generally speaking, fan-made Facebook Groups are an amazing sign that you are doing something big and right.
Facebook chatbot
Over 20 billion messages are exchanged between Facebook users and Businesses every month. That’s huge, right? 20 Billion! If you are not using the Messenger facility provided by Facebook, you are missing an opportunity to connect with your user.
You don’t want to be the brand that makes their customers feel ignored. According to Facebook’s research, one surveyed user said a customer would only wait 10 minutes for a response before moving on with another brand!
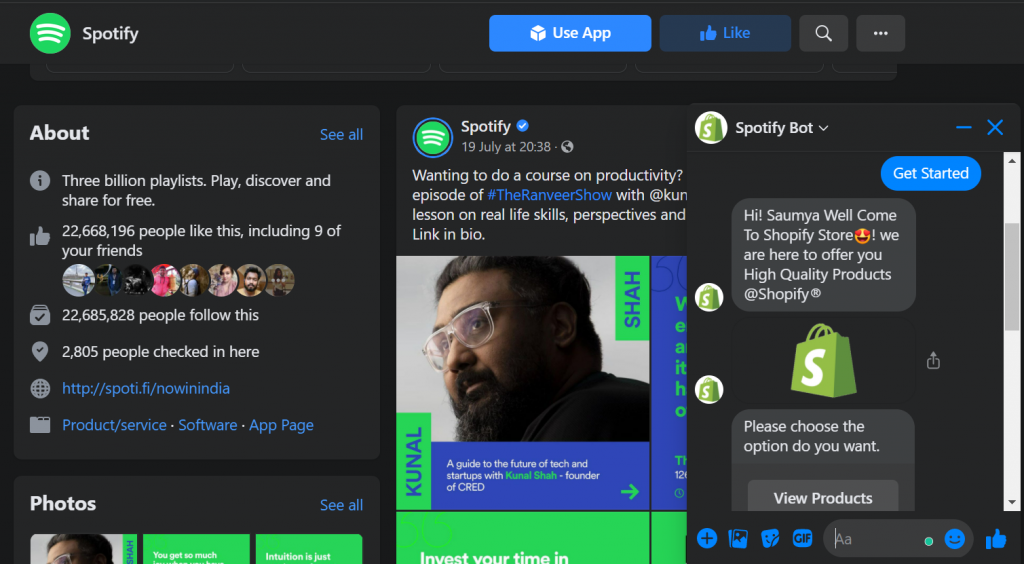
The solution? Chatbots! A Chatbot on Facebook is an AI program capable of “conversing” with people, responding to particular questions, and automatically providing suggestions. To work, a chatbot in Facebook must integrate with the Messenger chat application and operate from there. Example: Spotify

Measure the success of your strategy with Facebook analytics
Successful Facebook marketing requires maintenance. You can’t just set it and forget it; you have to track what works, measure your progress, tweak the strategy when needed, and keep trying new things so that success is inevitable!
You can track your metrics through Facebook Insights, which includes data like:
- reach (how many people saw your posts)
- likes
- which of your posts result in people unliking your Page
- engagement (how many people liked, clicked, shared, or commented on your content)
In addition, Facebook Insights can help you determine which types of posts work best for your Page so that you’ll know if the current content mix is working well.
Fortunately, there are plenty of ways to get thousands of targeted readers/listeners/watchers of your content for just a few hundred bucks. Do that a dozen times and you’ll know what content resonates.
Apart from Facebook Insights actions like purchases or other website conversions need to be tracked with external tools like Google Analytics, Mixpanel, etc.
Tracking your progress is about celebrating successes but also knowing what you need to do when things don’t work. Data will show if something needs tweaking or not, and by adjusting small changes over time, you can make bigger improvements in the long run!
Whew!
Facebook marketing is a big and intimidating space. There’s so much to learn! But the good news is that you can get started without spending any money at all.
So get in there, get your hands dirty, and let’s go!


